How To Crochet A Christmas Blanket!
I’ve been crocheting for over 40 years, and I’ve seen a lot of patterns come and go. But this Christmas tree blanket pattern is one of my all-time favorites. It’s so easy to follow, even for beginners, and the results are absolutely stunning.
Here are a few reasons why I think you should make this pattern:
- It’s a great way to get into the Christmas spirit. There’s nothing quite like cuddling up under a warm, festive blanket on a cold winter night.
- It’s a fun and rewarding project. It’s so satisfying to see your blanket come together stitch by stitch.
- It’s a perfect gift for friends and family. Everyone loves a handmade blanket, and this one is sure to be cherished for years to come.
But most of all, I recommend this pattern because it’s simply beautiful. The Christmas tree design is classic and timeless, and the colors are bright and cheerful. It’s the perfect blanket to add some holiday cheer to your home.
How cute is this?
So if you’re looking for a fun and rewarding project to work on this Christmas season, I highly recommend this Christmas tree blanket pattern. You won’t be disappointed!
Here’s a little tip from an old pro: if you’re using a variegated yarn, be sure to change the direction of your stitching every other row. This will help to create a more even color distribution.
I hope you enjoy making this blanket as much as I did!
What you need and how to make this Christmas blanket:
Materials:
Instructions:
- Chain 180 stitches.
- Single crochet in the second chain from the hook and in each chain across.
- Chain 1 and turn.
- Single crochet in each stitch across.
- Repeat steps 3 and 4 until the blanket is 6 feet long.
- Fasten off and weave in ends.
Christmas Tree Pattern:
- Using a contrasting color, crochet a Christmas tree design onto the blanket. You can use any Christmas tree pattern you like, but here is a simple one:
- Row 1: Chain 3, double crochet in the first chain, chain 2, skip 2 stitches, double crochet in the next stitch. Repeat across the row.
- Row 2: Chain 3, double crochet in the first chain space, chain 2, skip 2 stitches, double crochet in the next chain space. Repeat across the row.
- Row 3: Chain 3, double crochet in the first chain space, chain 2, skip 1 stitch, double crochet in the next chain space. Repeat across the row.
- Row 4: Chain 3, double crochet in the first chain space, chain 2, double crochet in the next chain space. Repeat across the row.
- Row 5: Chain 3, double crochet in the first chain space, chain 1, skip 1 stitch, double crochet in the next chain space. Repeat across the row.
- Row 6: Chain 3, double crochet in the first chain space, double crochet in the next chain space. Repeat across the row.
- Row 7: Chain 3, single crochet in the first chain space, single crochet in the next chain space. Repeat across the row.
- Fasten off and weave in ends.
You can crochet as many Christmas trees as you like onto the blanket. You can also vary the size and color of the trees.
Finishing:
Once you have crocheted the Christmas tree pattern onto the blanket, you can finish it off by crocheting a border around the edge. You can use any border pattern you like, but here is a simple one:
- Using the same color as the blanket, crochet a single crochet stitch around the entire edge of the blanket.
- Chain 1 and turn.
- Double crochet in each stitch around the edge of the blanket.
- Chain 1 and turn.
- Single crochet in each stitch around the edge of the blanket.
- Fasten off and weave in ends.
You can also add tassels, fringe, or other embellishments to the blanket. This is just a basic pattern, but you can customize it to create a unique and festive blanket for your home.
Printable How-To:
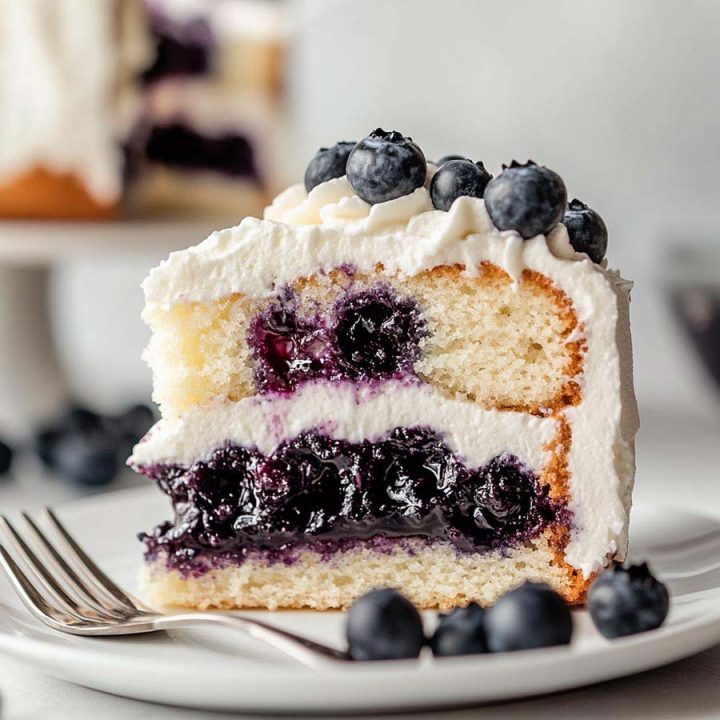
Blissful Blueberry Shortcake Cake
Indulge in this delightful Blueberry Bliss Cake, a perfect blend of fluffy cake layers, luscious blueberry filling, and creamy whipped topping. This light and refreshing dessert is ideal for any occasion, whether it's a summer picnic, birthday celebration, or just a sweet treat to enjoy at home. With its vibrant colors and irresistible flavors, this cake is sure to become a family favorite. Easy to prepare and a joy to share, your loved ones will be asking for seconds!
Ingredients
- 2 cups all-purpose flour
- 1 ½ cups granulated sugar
- ½ cup unsalted butter, softened
- 1 cup milk
- 3 ½ teaspoons baking powder
- 1 teaspoon vanilla extract
- ½ teaspoon salt
- 2 large eggs
For the Blueberry Filling
- 2 cups fresh blueberries
- ½ cup sugar
- 2 tablespoons cornstarch
- 1 tablespoon lemon juice
For the Topping
- 2 cups heavy cream
- ¼ cup powdered sugar
- 1 teaspoon vanilla extract
Instructions
Preheat the Oven: Preheat your oven to 350°F (175°C) and grease two 9-inch round cake pans.
Prepare the Blueberry Filling: In a saucepan over medium heat, combine blueberries, sugar, cornstarch, and lemon juice. Cook until thickened, about 5-7 minutes. Set aside to cool.
Make the Cake Batter: In a large bowl, cream the butter and sugar until light and fluffy. Beat in the eggs one at a time, then stir in vanilla. In another bowl, combine flour, baking powder, and salt. Gradually add to the creamed mixture alternately with milk.
Bake: Divide the batter evenly between the prepared pans and bake for 25-30 minutes or until a toothpick inserted in the center comes out clean. Let cool for 10 minutes before removing from pans.
Assemble the Cake: Once the cakes are completely cool, place one layer on a serving plate. Spread half of the blueberry filling on top, then add a layer of whipped cream. Place the second cake layer on top, and repeat with the remaining filling and whipped cream.
Chill: Refrigerate for at least an hour to set before serving.
Notes
More interesting articles you may be interested in reading:
How To Remove A Tree Stump Painlessly
10 Vital Home Maintenance Tasks You’ll Regret If You Forget
See How Much Propane Is Left In A Tank With No Gauge
Thanks for reading and be sure to share this info with your friends using the social share buttons below.
Talking about social stuff, consider liking our Facebook page to keep up to date with our articles. Check out our other articles for more mental scoops!
